Showing posts with label tutorials. Show all posts
Monday, November 21, 2016
Monday, November 7, 2016
#MakeIt Monday- Upcycled Pringles Can into a Gift Container
Check it Out! Last week I shared my adorable and easy to make floral petal butterflies. You can check out that post HERE. This week I wanna share another easy craft that I used some of those butterflies on.
Monday, October 31, 2016
#MakeIt Monday - Easy to Make Flower Petal Butterflies
Check it Out! I really love crafting and lately have been feeling so crafty. Since rearranging my craft room and better organizing my supplies, I have been getting some projects started and more importantly finished! So over the next month I plan to get some Make It Monday posts up and maybe a few others in between. I have a ton of ideas for holiday crafts and gifts, so be sure and come back to check them out!
Monday, February 22, 2016
Thursday, February 18, 2016
Thrifty Thursday - How to Make a Window Valance from a Bed Skirt
Check it Out! I am on a very strict budget, so buying curtains is not a top priority for me. I only have 2 windows in my front room, which we call the living room. It is a large open room that includes the dining room. I have this AMAZING sky blue color on my walls that I absolutely love. The valances that I have had on these windows since we moved in 3 years ago actually came from the Dollar Tree. Yes $1! About as cheap as you can get for a valance, but I have to admit, they also look cheap.
Monday, February 1, 2016
Saturday, February 14, 2015
#TBCCrafters Craft Hop - Memorial Block
Check it Out! I am super excited that my TBC Crafters post is being featured on The Brand Connection! Head over HERE and see how I made my Memorial Block. I am so proud of the way it turned out and can't wait for y'all to see it! I would really love it if you were to show me some love and leave a comment or share the post via your social media! Thanks!
Thursday, February 5, 2015
#TBCCrafters Craft Hop - CupCake Liner Valentines Wreath
Check it Out! I have no Valentine's Day decorations. I'm not kidding, not one! So when thinking of what I could craft for this week I decided it was time to make myself something with a Valentine's theme. I don't have a lot to work with in this area but I found these great cupcake liners marked down to $1.00 and I loved the patterns so I made a wreath using them a few other materials.
My materials for this craft included:
- 1 pack of cupcake liners
- 1 styrofoam round wreath
- 3 heart picks
- 1 button
- Lace
- Ribbon
- Hot Glue
- Sequin pins
- 1 XXL Glue Dot
To create this wreath I folded my liners in half and flattened them. I had 2 patterns of liners so I decided that I would alternate them.
Since I wasn't sure exactly how I was gonna pull the covering of the wreath off, I used sequin pins. I did this for 2 reasons, so I could move the liners if needed and so the styrofoam wreath didn't become distorted from the heat of hot glue.
I laid the liners across the wreath and then layered them to cover the wreath. Using the sequin pins to hold the liners on the bottom, one on each corner.
To create the back border I glued the flattened liners along the edge of the wreath. I again alternated the patterns. I used my glue gun on low temp and had to add a bead of glue to keep the liners closed.
I spaced the liners so that my pattern looked like a scalloped edge. It looked really plain so I grabbed some lace that I had lying around to use on the inside.
To add the lace I used the sequins that were already holding my liners in place. I simply pulled out the pin, added the lace and repinned. I did this all the way around the inside of the wreath.
To create the flower I took one liner, flattened it. I applied my XXL Glue Dot to the center and added 5 folded liners with the points to the center. I fluffed it up a bit and added a button to the center. I also added some ribbon and my heart picks to finish it off.
Thursday, January 22, 2015
#TBCCrafters Craft Hop - Matchbox Jewel Box
Check it Out! I received an Origami Owl locket for Christmas and I LOVE it! I have always wanted one because I just adore the ability to open the locket and change out the stones and charms according to theme.
I have discovered that you can find the little charms in many different places. Amazon for one and I found them at a very reasonable price at my craft store! Since I got a gift card to Joann's for Christmas I was able to purchase some extra stones. Now these things are tiny so I was thinking about how I could store them. I don't have a traditional jewelry box and I think they are a little to small and would get lost in there anyway so I wanted to come up with another way to store them.
So the other day I needed some matches to light a candle and I found a good little stash of these small matchboxes.
As I was opening the box to get out a match I thought about how my little charms would fit nicely inside and a new idea was born!
My supplies for this Mini Matchbox Jewel Box included:
- 3 Mini Matchboxes
- Patterned Scrapbook Paper
- Jeweled Brads for the drawer handles
- Beads for the feet
- Ribbon
- Assorted embellishments
- Glue - Double sided tape and E6000 adhesive
The first thing I needed to do was connect the boxes to create one piece. Using double sided tape I stacked and adhered them together.
Using the back side of the drawer as my template I cut pieces of paper to line the insides of the drawers.
I needed to cover the matchboxes to hide the writing and those gaps between the boxes, so I chose my patterned paper to match my jeweled brads. I cut a strip to fit around the outside and adhered it with double sided tape. Then I just slid my drawers into place.
Using 4 small coordinating beads, I created feet for my box. I simply glued them to each corner of the bottom of the box with the holes facing down.
I then embellished it with ribbon and assorted items.
I really love how it turned out and it is indeed perfect for my little collection of beads and charms. I can't wait to fill it up!
Thursday, December 19, 2013
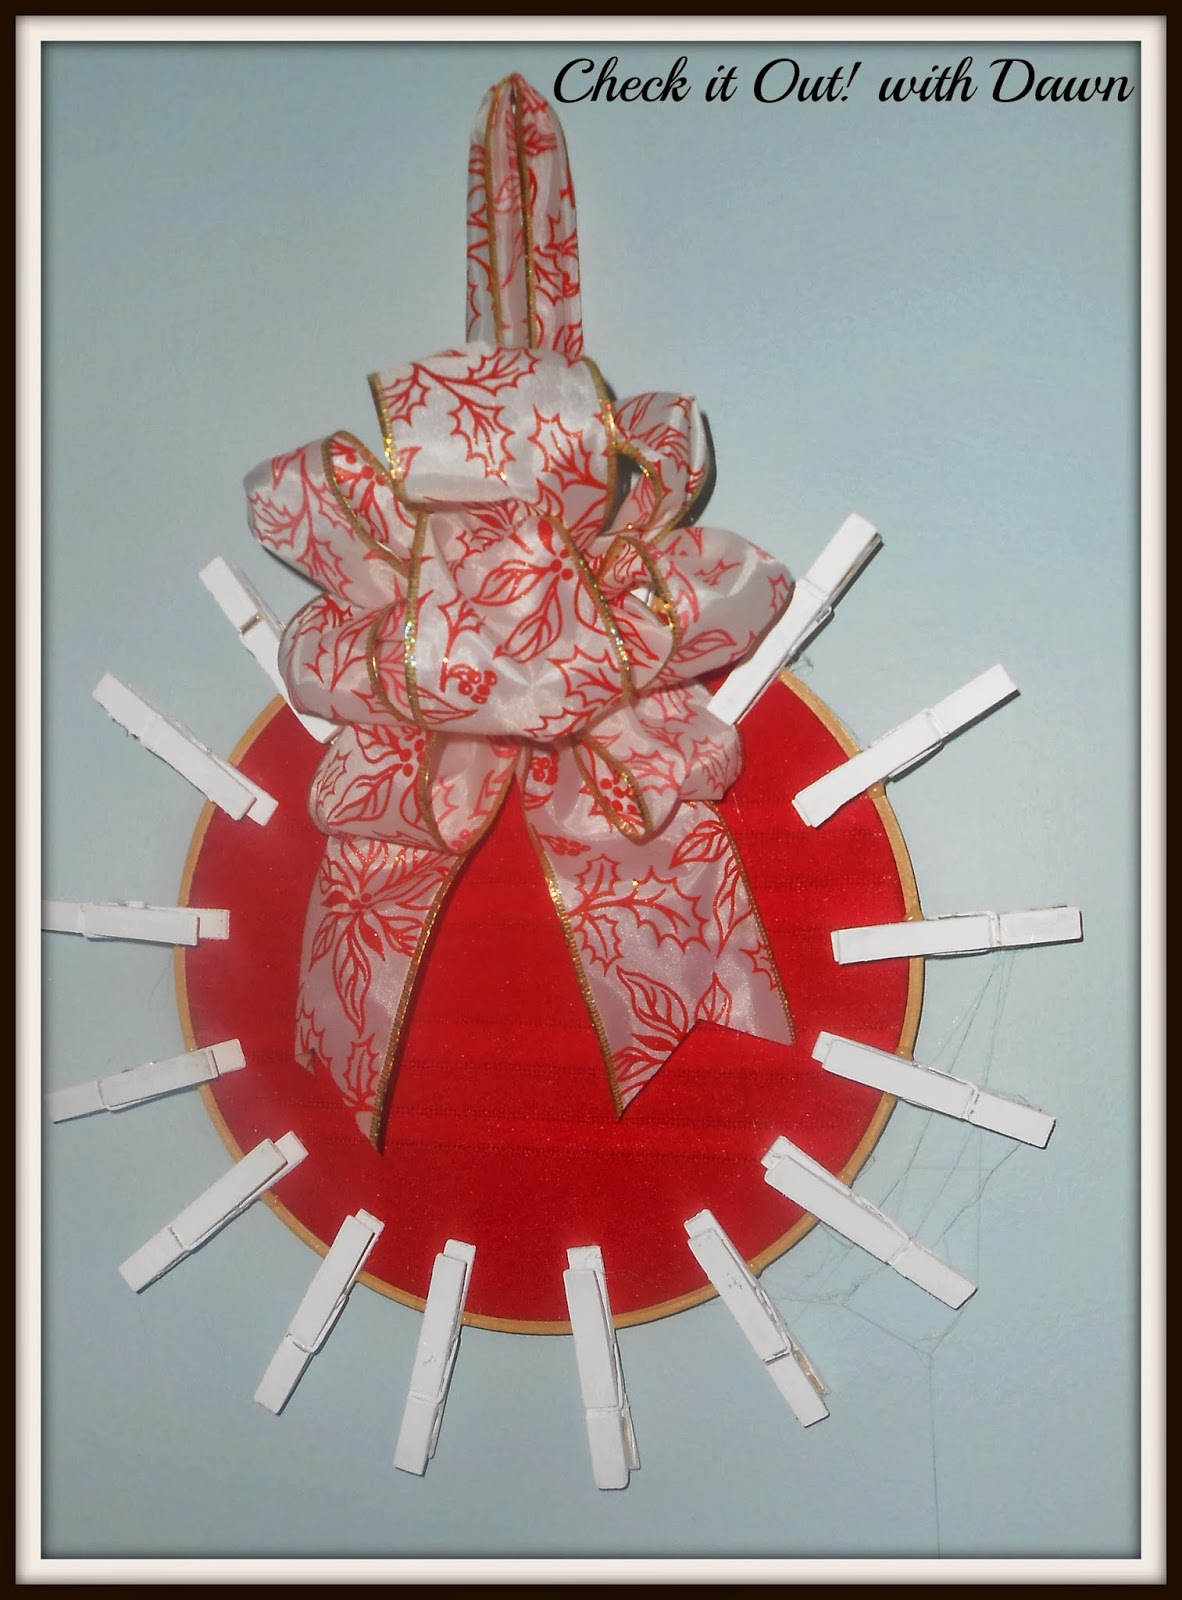
#TBCCrafters Craft Hop - Holiday Card Holder
Check it Out! I realized the other day that I don't have a card holder for my Christmas cards that have been arriving daily. I had a really beautiful metal over the door holder that would hold a lot of cards before the fire, but it didn't make it out.
Since I am all about working with what I have, I decided that even though I didn't have the fabric or scrapbook paper that I wanted, I could still pull this off. So I rounded up a few supplies and made myself a Holiday Card Holder!
For my base I used an embroidery hoop. My neighbor had given me some wonderful Christmas placemats and napkins so I decided to use one of the napkins as my fabric. I also used clothespins, ribbon, glue and white paint.
Here is how I put it together...
- Step 1 - I sandwiched my napkin between the hoops (you could paint your hoops first if desired)
- Step 2 - Trim the excess fabric off around the outside of the hoop
- Step 3 - Fold over edges to inside back
- Step 4 - Glue down edges all the way around
- Step 5 - I painted my clothespins white
- Step 6 - Glue the clothespins to the hoop at desired places
- Step 7 - Attach a ribbon hanger
- Step 8 - Attach the bow
Here is my finished holder with no cards. I used hot glue so I had some of those little glue strands, sorry forgot to clean them off before I took the pic. ;0)
Thursday, December 5, 2013
TBCCrafters Craft Hop - Reindeer Ornaments
Check it Out! Having lost a majority of our Christmas decorations to the fire, I have been thinking of ways to fill in those blank spots on the tree! I am not particularly fond of just plain ball ornaments and I love to have handmade ornaments on our tree as well. Thanks to my mom I have a box of ornaments that the kids had made over the years and gave her, and in that box was an ornament that we made around 7 years ago, a popsicle stick Reindeer. We actually made about 60 of these one year to give to all three of my kids classmates for Christmas and the kids loved them! We added a little message to the back with glitter glue and my kids really enjoyed being able to give everyone in their class a little something!
These ornaments are easy to make and would be great for group activities too. Here is how we made them...
Supplies:
- Popsicle sticks - 5 per ornament
- Brown felt
- Cream or Tan felt
- Wiggle eyes
- Red .5 inch PomPom
- Yarn
- Glue - I used hot glue, but you could use any kind of glue, including glue dots
- Step 1: I pre-cut my pieces so that the kids could just add them on without having to cut stuff out. For each Reindeer you will need 5 sticks, 1 triangle brown piece, 1 small triangle cream piece, 2 little ovals of brown felt for the ears, 2 eyes, 1 pompom and a piece of yarn for the hanger.
- Step 2: Arrange three popsicle sticks into a triangle to create the head and glue them together as seen in the pic. You can now use this to get your brown felt triangle size. Just cut to fit inside the large triangle.
- Step 3: Flip the triangle over and glue on 2 more sticks in an upward V shape to create the antlers.
- Step 4: Flip it back over and glue on your brown felt square.
- Step 5: Add a red pom pom to the tip of the triangle to create the nose and add a small triangle of cream felt to accent the reindeer's forehead.
- Step 6: Add the two little oval pieces to the top corners of the triangle to create the reindeer's ears.
- Step 7: Add the wiggle eyes.
- Step 8: Glue on a piece of yarn to create the hanger.
Cute and easy, my fave kind of craft to do with the kids and this is something that we will get to enjoy year after year as we bring it back out to hang on the tree!
Happy Crafting!
Thursday, November 14, 2013
#TBCCrafters Craft Hop - Holiday Mailbox Arrangement
Check it Out! I am so excited to decorate for Christmas and I have been feeling so creative lately! The Christmas commercials are starting on TV and I keep hearing some Christmas music so I am getting itchy!
I was driving down to the mall the other day and saw a beautiful fall arrangement on a mailbox and I thought, "I can make that!" so today's craft is inspired by that arrangement I saw but with a Christmas theme.
I had that swag left over from my swag to tree up cycle craft, you can check it out HERE, if you missed it, and I decided it would be perfect for my base, all I had to do was bend it!
My supplies were pretty basic and cheap! I found these really great glittered/plastic bells at The Dollar Tree and I had 3 picks that survived some of the Christmas supplies found after the fire. They have no physical damage, just smell, but will still work fine outside! I also used ribbon. My neighbor gave me this awesome roll of holiday ribbon, the kind with the plastic backing, so I knew it would be good to use outdoors.
I also used hot glue, twist ties and a spray sealer to keep everything more weather resistant.
So here is how I put it together:
- Step 1 - I sprayed the bells with two coats of the sealer. Then I allowed them to dry over night. I bent the swag into a U shape that would fit nicely over the top of my mailbox. I used a tall slim box as my work base.
- Step 2 - I attached the bells, using the string on the bells, to each side of the swag.
- Step 3 - I cut 4 strips of ribbon to make single bows for stacking. This is a super easy way to make a large bow!
- Step 4 - Fold the strips in half, I use bread ties to cinch them closed in the center, making 4 single loop bows.
- Step 5 - Layer the single loop bows in opposite directions in the top center of the swag. I added a pick to each side of the bow and one in the center. You could add more pinecones and picks and really fill it up, but I was working with what I had at the moment.
- Step 6 - I then attached a piece of ribbon to each side under each bell and a string on the underside so that I could wrap it around the mailbox to secure it.
- Step 7 - I then sprayed the entire arrangement with another 2 coats of sealer and allowed it plenty of time to dry.
I love how it turned out and I really love that it only cost me $2 to make it!
Do you decorate your mailbox for the holidays?
Tuesday, October 29, 2013
Trunk or Treating! How to turn your Van into an Open Mouth for $5!
Check it Out! This Thursday is Halloween and if your looking for a quick and easy way to decorate your trunk for a Trunk or Treating Event, I have got a super easy one that can be adapted to many vehicles and enhanced to make look even better. I found the idea on Pinterest and they were all done differently so I decided to take the idea and personalize it to my van. Now I needed to do it rather quickly and cheaply, because I was lacking in time and money so I put my brain to work- at the Dollar Tree! I was able to purchase the supplies I needed for under $5!
- Black tablecloth
- Red tablecloth
- white tablecloth
- 2 pieces of white poster board
I also used clear tape, scissors, black sharpie and a large piece of cardboard.
This is a super simple project to put together.
Step 1: Your large piece of cardboard should fit in the large portion of the trunk to create an even black background. I had a box from a desk that I had bought, not only was it bendable, but it fit my hole perfectly! I just covered it completely with my black tablecloth.
Step 2: I drew my teeth onto the two pieces of posterboard. Each half of a piece of poster board fit perfectly across the span of my trunk door, so I put a fang and about 4 teeth on each side and taped them together in the center. I drew one and traced it onto the other so they looked even.
Step 3: I used the two left over pieces of poster board to create my lower teeth. They are shorter but they also leave room for my tongue.
Step 4: I added lines to my cut out teeth to make them look more real. If you were going for a more creepy look, you could add blood to your fangs!
Step 5: Cut out a white piece from the white tablecloth for the center of the throat. I just used a strip and rounded one edge.
Step 6: Cut a tongue out of the red tablecloth. I cut a folded over long strip out, since I wasn't sure how long I wanted it to be, and then rounded the end. I taped it all closed. I used multiple layers so that it would be thicker and sturdier.
Everything fit right into the back of the van and didn't even take up much space!
To set it all up I simply propped my black background up and then using the clear tape, I taped the long top teeth to the edge of my trunk and then I was able to stand up my bottom teeth using my storage compartment lids. I then taped the rounded white part to the center right behind the tongue opening and added my tongue. I could have had it all the way to the ground, but I didn't want to be tripping over it so we shortened it up. I was able to use a small piece of tape to stick it to the bumper so it didn't blow around. I covered the rest of the bottom of the trunk with my left over red tablecloth and then I added my bowl of candy to the center on top of the tongue.
If I had had more time, I may have added some eyes to the top and covered in the sides with more black tablecloth, but I am happy with how it turned out and we got lots of compliments. Thanks to my baby girl for giving me a hand at the event!
Thursday, October 17, 2013
#TBCCrafters Thrilling Thursday Craft - Three Wreath Fall Arrangement
Check it Out! I am really loving this time of year and the weather has been so fabulous here in Georgia in the mornings that I have even been crafting outdoors! Whoot! I get so excited when I find inspirations and this past week I hit the motherload of Fall inspiration! Check out what my next door neighbor gave me:
I was absolutely blown away once I got to going through these tubs! She gave me so much stuff that I really felt like I had just robbed a craft store! I will forever be grateful to her. I have been so blessed to move into this neighborhood and have amazing neighbors. It is my misfortune that one of them will be moving next year, but also my good fortune that she doesn't want to move all this stuff with her so I happily volunteered to take it off her hands! lol
Well you can imagine how excited I was and I could hardly wait to get started. I decided I wanted to use up those last 3 mini vine wreaths that I had and I initially created this wreath to be put outside my den doors. These are the doors we use the most. So I picked up a roll of that $1 ribbon from the Dollar Tree and pulled out a fall pick that had a pomegranate and berries on it as well as a leafy stem with some fern on it. I also used some zip ties, got them at the Dollar Tree too, and hot glue.
Here is how I put it together:
Step 1: I decided on a triangle configuration so I zip tied the wreaths together working to keep the zip ties in the back of the wreath so they don't show from the front.
Step 2: Cut off the excess pieces of zip ties after they are pulled as tight as possible.
Step 3-4: Using ribbon I made 3 single bows
Step 5: I glued the ribbons to the center of the vine wreaths at different angles to create a bow
Step 6: Add the pick and fill in the gaps and holes with the pieces off the leafy stem. You can also add a hanging hook to the back as well, I didn't until I was all done, because I wasn't sure how I wanted it to hang!
This is what it looked like before I sprayed it with a clear sealer to make it more durable. The very top picture is what is looks like sprayed with the sealer. I sprayed the whole thing, bow and all! I love how it turned out!
Thursday, October 10, 2013
#TBCCrafters Thrilling Thursday Craft - Fall Mini Wreath Swag
Check it Out! I am really in the fall mood these days and ever since my trip to the dollar store, I have been inspired to create another fall arrangement, but this one is for the wall! I had some great dollar items and some of those fall leaves left over so I used these supplies on some mini wreaths that I picked up at a yard sale last weekend. I bought 6 of these vine wreaths and they had some hodge-podge Christmas decorations on them so I stripped them clean and used 3 of them.
Supplies:
- 3 mini vine wreaths
- fall leaves
- ribbon
- felt pumpkins
- letter stickers
- wooden fence pieces
- glitter pumpkin sticks
- bread tie
- hot glue
- mod podge
Here is how I made my swag:
Step 1: Make a bow with the ribbon leaving a long tail and attach it to one of the wreaths, just under the bow, where your tail hangs down. Since your working in this area anyway, now is a good time to attach a hanger. I use left over bread ties to make my hangers, they are free, easy to use and always around! Just make a loop and hot glue it to the center of the back of your ribbon.
Step 2: Stretch your ribbon so that it lies straight down the wreath and hot glue it to the base of the wreath. I ran a bead of glue over the back of the ribbon where it is attached to my wreath to give it more strength.
Step 3: Attach the other two wreaths, pretty much the same way. I added the beads of glue to the backs and gave them plenty of time to dry and set.
Step 4: Trim the ribbon tail. I fold my ribbon in half and cut on an angle to get an even cut.
Step 5: Add embellishments. I laid out where my felt pieces would go and then glued them down, adding leaves to fill in any gaps and/or holes.
Step 6: I added my letter stickers to my fence pieces and because I want them to stay, I added a few coats of mod podge over top of them to secure them from peeling off. I then glued them on top of the felt pumpkins and added those pumpkin picks. I just cut off the sticks.
One of the things I really like about creating an arrangement like this is that there is no right or wrong and it's totally up to your taste how you make it! I really love how mine turned out!
Subscribe to:
Posts (Atom)


+(1).jpg)